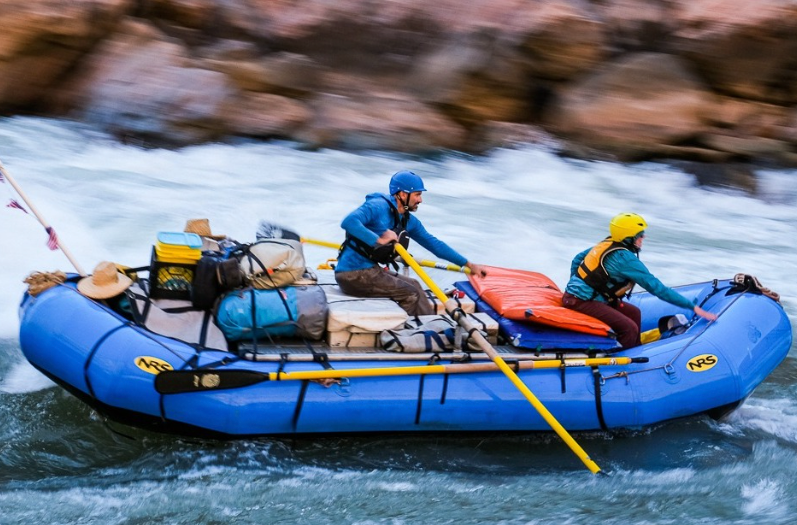
Choosing the right raft or cataraft frame can be one of the most challenging aspects of buying or designing a raft package. Calculating proper dimensions and geometry, as well as how to integrate all the accessories and rigging can leave you with your head spinning. This guide will hopefully help you to narrow it down and pick the right frame for your boat and budget.
The first question to ask yourself is how you will primarily use your raft? Will you be taking day trips or single overnight trips, multi-day trips, or fishing trips? The type of boating you plan to do determines what kind of frame you need.
For example, for day and single to two-night river trips, you can use a smaller, simpler frame, whereas multi-day and fishing trips require more bays and a more thoughtful design. Once you determine this, you can start looking at what frame is right for you.

Raft Frames
For day trips with friends or family, a small center frame like the Big Horn 1 from NRS is a good choice. These 2-3 bay setups are perfect for smaller boats or for trips that don’t involve much gear. You may also consider a stern frame if you want to run a paddle crew or maximize your passenger space. Stern frames sit in the very back compartment of the raft, freeing up more space for a larger group of people and can free up thwart space for paddlers.
For those planning multi-day trips, we recommend a larger center frame with three to five bays, such as the Compact Outfitter or Big Horn II. These larger frames allow you to bring more and larger gear items, including coolers, dry boxes, a rack of ammo cans, or a drop bag full of necessary overnight river camping gear.

Raft Frame Dimensions
The next step in river raft frame shopping is determining what size frame you need or the frame dimensions. This requires checking with the manufacturer or measuring the boat yourself. Before you get your tape measure, check the boat manufacturer's website to see if they offer wire-frame diagrams or measurements of your boat. If you can’t find the boat’s measurements, you will need inflate your boat and measure it yourself.

LENGTH: As a general rule, it’s best to keep your frame length the same length as your chafe strip, or about a half-an-inch to an inch shorter than your overall flat tube length, if your boat doesn't have a chafe strip. (Tributary HDs are an exception to this and can often be pushed an additional 8-10" length overall.)
WIDTH: For single rail frames, matching the center-to-center or adding 2-4" overall is optimal. NEVER go less than the C2C measurement. This is the optimum width for single-side rail frames. For double-rail or diamond plate frames, add 6 to 8 inches to the overall width measurement.
Cataraft Frames
Choosing a cataraft frame is even more difficult as cat frames create the boat’s structure. Without a frame, you are left with two disembodied banana-shaped tubes. Most catarafters will choose a three to five-bay frame.
 To determine the size of your cataraft frame, you'll do the same steps as above for the overall frame size, but you'll need to determine the depth measurement for your drop rails as well. As a rule of thumb, you'll want your drop rails at least 3" above your d-rings, or an approximate 9"-10" drop for tube sizes over 22" and 6-8" drop for tubes under 22". Drop rails will often determine / limit your bay spacing options, so be aware of this in your next step.
Configuring Your Frame Setup
Once you know the dimensions of your frame, you’ll need to configure your crossbars, bay space, footwell, and foot bars. Let’s take a closer look at each.

Crossbars and Bay Space
Where you put your crossbars depends on what you want to carry in your frame. If you have dry boxes, a cooler, and ammo cans, you need to configure your frame and crossbars to create bays that accommodate each gear piece. Measure your cooler or dry box and adjust your crossbars to the corresponding widths.
Most boat captains like to have their cooler in the front bay for the added weight and use their dry box as a rower’s seat. Try different configurations to figure out what works best for you.
Our personal favorite is as follows (front to back):
- Camp Table / Drop Bag - great for passenger seating as well as stashing pumps, camp chairs etc in the drop bag underneath.
- Cooler - Easy access, keeps the weight towards the front, and separates the passengers from swinging oar handles.
- Foot Well - Add captain's bags or boxes, stash pockets, or water jug slings for maximizing otherwise wasted storage space.
- Drybox -Doubles as a rowers seat. Add a drybox seat pad or a flip seat for more comfort.
- (Optional) Skinny bay for 2 ammo cans turned sideways. Perfect groover or trash storage.
Spacing
Determining bay spacing is critical to make sure everything fits. Your cooler and box sizes will determine those bays. Its helpful to draw everything out to visualize your spacing before hand. Remember to subtract the width of the crossbars, approximately 1.5" for each (i.e. if you have 5 crossbars, you need to subtract 7.5" from your total length).
Ideally you want to suspend EVERYTHING off of the floor so that your boat can perform how it was designed to. Extra weight on the floor only slows you down and makes handling less responsive by not allowing the floor to articulate. So make sure you are making your bay spacing tight enough and consider adding slings / drop bags / bargo floors, etc. while thinking up your design.
The space where your legs and feet sit while you row is called a footwell. A footbar is what you brace your feet against while you row. Getting your footwell and footbars configured to your height and comfort is essential for raft control and power as you move your boat. If you're running a cooler directly in front of your footwell, we highly recommend the Coyote Footbar to maximize space.

The footwell spacing will depend on your height and what you're sitting on. When sitting and rowing from your dry box, cooler, or flip seat, we recommend that your footwell is approximately 22". For those using a high or low-back padded raft seat mounted directly to a crossbar, the footwell should be approximately 30"
Our twenty-two-inch recommendation is a good place to start, but the best way to dial in your footwell is to sit in your frame and see what size footwell works best for you. For taller folks, twenty-four inches might be more appropriate, and for boat captains on the shorter side, try a space closer to twenty inches. Seat height will also affect this measurement.
Oar Tower Height
Determining your oar tower height (and oar length) is critical for rowing mechanics. Most people prefer 8-10" tall oar towers, but you may want to go taller if you're sitting up super high on a Captain's Chair or the like. 6" towers are usually used on small boats (9-12'ers) where you're sitting pretty low and if you're not a very tall person. When in doubt, go taller.
To then determine oar sizing, measure the distance between your oar towers, divide that by 2 and then multiply that number by 3. This is your ideal oar length. LONGER IS RARELY BETTER because you're decreasing your mechanical advantage and will probably start hitting your knees more.
As a rule of thumb, here are the ideal oar sizes by frame width.
- 54" - 8' - 8.5' oars
- 60" - 8.5' - 9' oars
- 66" - 9' - 9.5' oars
- 72" - 9.5' - 10' oars
Fishing Frames

To find the right fishing frame, follow the same fit and measurement guidelines as you would for a raft frame, but keep in mind the fishing accessories you will be incorporating. Generally most folks will add front and rear swivel seats, lean bars and casting platforms, which all add complexity to the setup. We recommend leaving a little extra length / bay space in your frame setup to allow for adjustment of each fishing accessory. It will also allow for a little extra elbow / casting room. Don't try to pack things into every inch like you would an expedition setup.
Raft Frame Takeaways
Finding the correct frame for your river raft is not as complicated as it might seem, but definitley warrants ample due diligence. If you are completely lost, don’t hesitate to contact our shop experts. We are happy to walk you through the frame decision process.
Once you have the right frame, configuring everything, including where to put your gear and how big to make your footwell, can take a few laps on your favorite run and make adjustments as neccessary. Luckily, nothing’s better than a day on the river. See you out there!